Scenario: A local private network and a private network in Amazon Web Service (AWS) needs to be connected securely over the internet through an ipsec VPN. In order to cover an expanded scope, VPN tunnel will be established between Openswan ipsec VPN from AWS to pfSense ipsec VPN in local network.
Main AWS VPC in this scenario “172.31.0.0/16” has 2 subnets, Backend (172.31.1.0/24) and Frontend (172.31.2.0/24) respectively. Application servers are hosted in Backend subnet while Openswan VPN server is hosted in Frontend. All traffic between these 2 subnets are allowed.
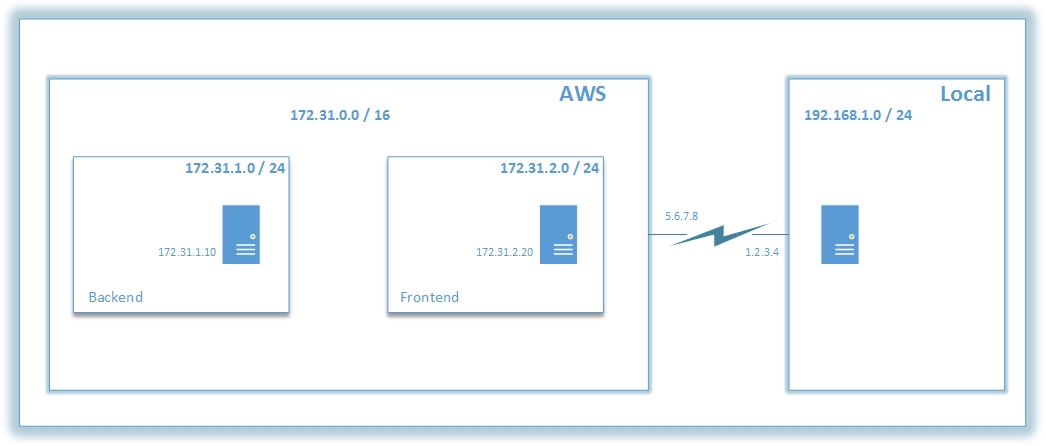
Site-to-Site VPN Topology
Backend
Except the local traffic, all traffic in Backend subnet is directed to Openswan VPN server. Access to and from internet for Backend is restricted.
Frontend
All traffic from public IP of local VPN server is allowed to Frontend. Access to internet from Frontend is allowed.
Configuration
For convenience and ease of configurations, arrange the required configurations parameters as follows.
Site Local Remote (AWS)
Public IP 1.2.3.4 5.6.7.8
Private Network 192.168.1.0/24 172.31.0.0/16
Local IP N/A 172.31.2.20
Phase 1
Encryption algorithm aes-256 aes-256
Hash algorithm sha1 sha1
DH key group 2 modp1024
Pre-Shared Key mypresharedkey mypresharedkey
Phase 2
Protocol esp esp
Encryption algorithms aes-256 aes-256
Hash algorithms sha1 sha1
PFS key group no no
Once required information’s are gathered, it’s time to start configuring the required virtual private cloud (VPC) in the AWS.
VPC and Subnets
Create a new VPC “172.31.0.0/16” from VPC dashboard. Give a name tag for easy reference. Next, create 2 subnets from created VPC and name tag them “Backend” and “Frontend”. Give “172.31.1.0/24” as the CIDR block for Backend and “172.31.2.0/24” as the CIDR block for Frontend.
Security Groups
We need to create security groups to allow access to servers in each subnets Frontend and Backend. For each security group, give a proper “Name tag” and “Group name” for easy reference (eg: VPN Backend). Select “172.31.0.0/16” as the VPC. Once these security groups are created, note down the “Group ID” of each security groups. Inbound rules for Backend is “All traffic” from FrontEnd. You can specify the Frontend security group ID as the source. Likewise, do the same configuration for Frontend Security Group as well. For Frontend Security Group, remember to allow all traffic from local pfsense VPN IP address (1.2.3.4).
Now it’s time to create EC2 instances and apply our configuration. First, let’s configure an instance for a backend server.
Backend EC2 instance
Amazon Linux 64 bit t.micro server will be enough for this scenario. Select the VPC network as “172.31.0.0/16” and Subnet as “172.31.1.0/24”. You can assign a Private IP address for the network interface (172.31.1.10) of this instance for easy reference. You can select the default storage and give a proper name tag too “VPNBackend”. In Security group section, select the Backend security group we created earlier for this instance.
Frontend EC2 instance
This is same as the Backend EC2 instance, except select “172.31.2.0/24” as the subnet and Frontend security group as the security group. Give the IP Address 172.31.2.20 for the network interface.
Elastic IP
We have to allocate an Elastic IP for the Frontend instance. If you don’t have an Elastic IP, you can allocate a new Elastic IP address from “Network & Security > Elastic IPs” from EC Dashboard. Once allocated, you can select the IP and associate it to an instance by specifying the Frontend instance ID.
Route Tables
Create a new route table from VPC Dashboard for the Backend subnets. Add a new route in the routing table for default traffic (0.0.0.0/0) and then specify the Fronend instance ID as the target. Next, associate this routing table to subnet “172.31.0.0/16” from Associations.
Install Openswan
Connect to Frontend instance and get the latest updates. To install Openswan and updates, run below commands.
$ sudo su
$ yum update -y && yum install openswan -y
Make sure the service start at reboot
$ chkconfig ipsec on
To turn on ip forwarding in the Frontend server, make sure below settings are enabled as follows in “/etc/sysctl.conf”
net.ipv4.ip_forward = 1
net.ipv4.conf.all.accept_redirects = 0
net.ipv4.conf.all.send_redirects = 0
net.ipv4.conf.default.send_redirects = 0
net.ipv4.conf.eth0.send_redirects = 0
net.ipv4.conf.default.accept_redirects = 0
net.ipv4.conf.eth0.accept_redirects = 0
To save the file and apply the changes
$ sysctl -p /etc/sysctl.conf
Now it’s time to configure the openswan ipsec VPN tunnel. We’ll be making these configuration in the /etc/ipsec.conf. Start by specifying the private remote networks this VPN tunnel will be connecting together.
virtual_private=%v4:192.168.1.0/24,%v4:172.31.0.0/16
After that, we can configure the Phase 1 and Phase 2 of the tunnel creation process. In our scenario, the configuration will be as follows,
conn aws-pfsense
authby=secret
auto=start
type=tunnel
left=172.31.2.20
leftid=5.6.7.8
leftsubnet=172.31.0.0/16
right=1.2.3.4
rightsubnet=192.168.1.0/24
ike=aes256-sha1;modp1024
phase2=esp
phase2alg=aes256-sha1;modp1024
To configure the pre-shared key for this tunnel, edit the /etc/ipsec.secrets file with the pre-shared key you want to use between your peers as per below format.
<Local (LEFT) Public IP> <Remote (RIGHT) Public IP>: PSK “presharedkey”
For our scenario, this will look like this,
5.6.7.8 1.2.3.4: PSK “mypresharedkey”
Configuration for Openswan is done now and you can restart the service to make the changes effect.
service ipsec stop //Stop the service
service ipsec start //Start the service
service ipsec status //Status of the existing tunnels.
pfSense
Now let’s configure this tunnel in pfSense. In “VPN > IPSec” page, create a new Phase 1 entry by giving below settings.
Local endpoint Interface: 1.2.3.4
Remote gateway: 5.6.7.8
Pre-Shared Key: mypresharedkey
Encryption algorithm: AES 256 bits
Hash algorithm: SHA1
DH key group: 2
Dead Peer Detection: Disabled
Now for the created Phase 1 entry, create Phase 2 entry with below settings.
Local Network Type: Address
Local Network Address: 192.168.1.0/24
Remote Network Type: Address
Remote Network Address: 172.31.0.0/16
Protocol: ESP
Encryption algorithms: AES 256 bits
Hash algorithms: SHA1
Save the configurations and Select “Enable IPsec” from “VPN > IPSec” page to start the tunnel. Go to “Status > IPsec” page to check the status of the VPN tunnel that we created.
That’s it folks. Enjoy..!